Keurig Won’t Brew — Start Here
Keurig troubleshooting has gotten complicated with all the conflicting advice flying around. As someone who has killed two Keurigs and resurrected three others, I learned everything there is to know about why these machines stop brewing. Today, I will share it all with you.
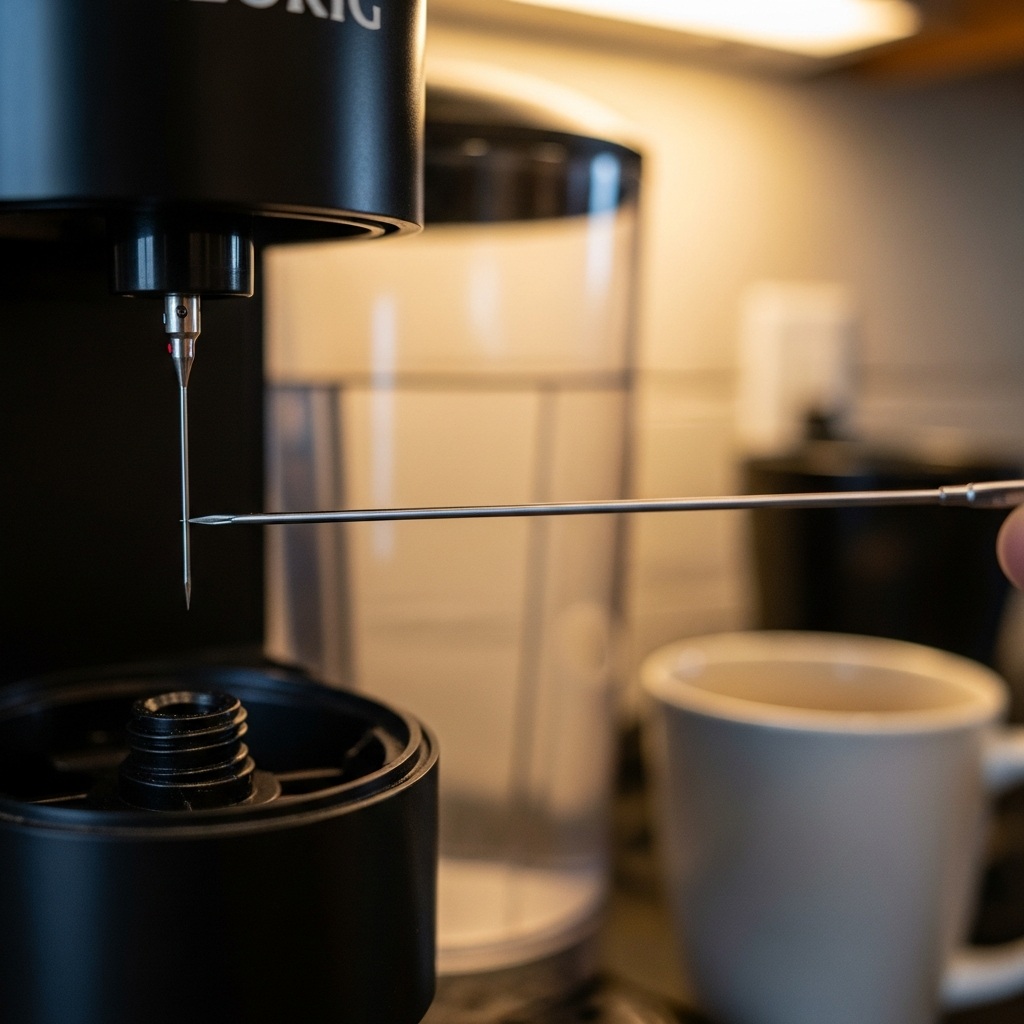
Your Keurig won’t brew. Water goes in. You press the button. Nothing comes out — maybe a sad drip, maybe a wheezing sound that suggests the machine has made a personal decision to quit. Before you rage-order a replacement at 11pm, try this: the needle is clogged. I’m serious. Fixes about 85% of dead Keurigs. I learned that the hard way after calling support three separate times before someone finally asked, “Have you cleaned the needle?” That was embarrassing.
Here’s the fix. Unplug the machine completely — not just power it off, actually unplug it. Lift off the pod holder, the plastic piece that cradles your K-cup. Look up inside the brew head and you’ll see a small needle. That’s the entry needle. Flip the pod holder over. There’s another needle on the bottom. Both get packed with coffee grounds and mineral scale because water blasts through them several hundred times over a machine’s life.
Grab an unfolded paperclip. Poke each needle hole gently. The top needle lives under the brew head. The bottom one sits dead center on the pod holder. Go slow — you’re clearing compacted debris, not drilling a well. Rinse the pod holder under warm water for about 20 seconds afterward.
Reassemble everything. Run two full cycles with just water, no pod. If water flows normally, you won. Congratulations. Your machine cost you a paperclip to fix.
But what is the needle, really? In essence, it’s a hollow spike that punctures the K-cup and delivers pressurized hot water through the grounds. But it’s much more than that — it’s also the most common single point of failure in the entire machine, which is why this fix works so often.
One exception worth knowing: if you own a K-Supreme or K-Supreme Plus, stop and look more carefully. Those models use a five-needle multi-stream design rather than a single entry point. You’ll see five small holes instead of one. Each hole needs clearing individually — same paperclip method, but be thorough and patient. That’s what makes the K-Supreme endearing to us coffee people — better extraction — but it also means more maintenance.
Keurig sells an official needle cleaning tool for $9.99. It works identically to a paperclip. I’m apparently someone who bought it anyway, and honestly, a standard paperclip works just as well while the branded tool collects dust in a drawer. Don’t make my mistake.
Keurig Says Prime or Won’t Pull Water
The screen flashes “PRIME.” The machine refuses to brew. You’ve never encountered this word in this context before today and now you hate it.
Prime means the machine detects an air bubble in the water line and wants you to run it empty to push that air out. Sometimes the error is real. Sometimes the machine is just being dramatic about nothing. So, without further ado, let’s dive in.
Start with the reservoir. Lift it completely off the machine — don’t tilt it, fully remove it. Look at the bottom. There’s a small valve and a spring. Rinse both under warm running water for about 15 seconds. Debris can settle in that valve and convince the machine the line is empty when it isn’t. Wipe the contact surface on top of the machine where the reservoir seats. Press the reservoir back down firmly until it clicks.
Run a water-only cycle. Still showing Prime? The valve might have scale buildup holding it partially shut. Unplug the machine. Remove the reservoir. Fill a mug with plain white vinegar — the $2.49 store-brand stuff works fine — and soak just the bottom valve section for 10 to 15 minutes. Rinse thoroughly. Reseat. Try again.
Still nothing? Unplug the machine and gently tip it side to side while unplugged. You’re trying to shake loose an air bubble trapped somewhere in the internal water line. This sounds ridiculous. It works. I’ve done it twice.
Here’s the part Keurig buries on their support page: most models have a descale indicator that activates around 250 brews. Ignore that light for several months and the machine eventually throws a Prime error — even though the problem is actually scale coating the internal pathways, not an air bubble. If you’ve been ignoring a descale notification, run a full descale cycle immediately. I cover the exact process in the next section.
Quick note for K-Mini owners specifically: the K-Mini uses a single-fill reservoir with no bottom valve assembly. If your Mini is throwing Prime errors, the reservoir isn’t the issue. Go back to the needle cleaning section. That’s your answer 90% of the time.
Keurig Brewing Weak or Only Half a Cup
You selected 12 ounces. The machine dripped for three seconds and stopped. Your mug has more air than coffee.
Probably should have opened with this section, honestly. Scale buildup is the real culprit behind most weak-brew complaints — but there’s a secondary cause worth ruling out first. The exit needle might be partially clogged. Grounds or scale blocking the path between the pod and your cup will cut the brew short and choke the pressure. Use the paperclip method from the first section. Takes two minutes.
But what is descaling, really? In essence, it’s flushing dissolved mineral deposits — calcium and magnesium — out of your machine’s internal components. But it’s much more than routine maintenance. It’s the difference between a machine that lasts five years and one that dies at eighteen months.
Keurig’s official descaling solution runs about $12.99 for a two-use bottle. A 50/50 mix of white vinegar and water costs essentially nothing and works the same way. Fill the reservoir with your descaling liquid. Place a large mug under the spout. Run three full brew cycles — largest size setting each time — emptying the mug into the sink between cycles. Then fill the reservoir with fresh water and run 12 rinse cycles. Twelve. Not four, not six. Twelve. This takes roughly 45 minutes total.
I know that sounds excessive. The scale coats the pump, the internal lines, the heating element, and the needles — all of it needs flushing. Twelve rinses aren’t overkill. When you’re done, run two additional plain-water cycles. Brew strength should return to normal.
Model-specific note for K-Slim owners: the K-Slim’s drip tray sits slightly elevated, and the mug sits lower than expected. Some people think they received a partial cup when they actually got the full 8 ounces they selected. Pour what you brewed into a measuring cup before assuming something is wrong. If it’s genuinely short, clean the needle or descale. If it actually measures correctly — congratulations, you’ve just met the K-Slim’s most confusing design quirk.
Keurig Leaking From the Bottom or the Pod Area
Water is pooling under your machine. This is the moment most people consider switching to instant coffee and moving on with their lives.
Bottom leaks almost always mean the internal hose running from the reservoir to the pump has cracked or pulled loose from its fitting. That’s a hardware failure — not a user fix on most Keurig models. Be honest with yourself about that before spending an afternoon on it.
Check your warranty first. Machines under one year old get replaced. Call 1-800-901-2539 or go to keurig.com/support. They handle it without much argument and frequently ship a replacement without asking you to return the broken unit. That was my experience with a K-Classic that started leaking at eight months — new machine arrived in four days, no box required for the return.
Out of warranty with a bottom leak? That usually means replacement, not repair. Parts plus the time investment cost more than a refurbished K-Supreme at $99 from Keurig’s certified refurbished store. That’s not giving up. That’s just math.
Pod area leaks are a different problem entirely. First, test with an official Keurig K-cup — not an off-brand pod, not a reusable cup. Some third-party pods don’t seat correctly and overflow during brewing. If a genuine K-cup still leaks, the upper gasket is probably worn. That’s the rubber seal surrounding the top needle. Replacement gaskets run about $6 on Amazon — search “Keurig upper gasket” plus your exact model number. The K-Classic has a well-documented gasket failure pattern after two to three years of regular use. Five-minute fix if that’s your issue.
When to Just Replace It
Here’s what the internet usually won’t tell you straight: some Keurig problems are worth fixing and some aren’t. Knowing the difference saves you a weekend.
Needle clog? Fix it — takes three minutes. Descaling needed? Fix it — takes 45 minutes. Bottom leak on a machine you’ve owned for three years? Replace it. Machine hums but no water moves at all, meaning the pump is dead? Replace it. That pump repair requires disassembly, a replacement pump around $15 to $25, and about two hours — on a machine that was already three years old when it failed.
A new K-Classic runs $79 at Target. A certified refurbished K-Supreme runs $99 direct from Keurig with a one-year warranty attached. I’m apparently someone who has done the repair math wrong twice before accepting this reality, and replacing instead of repairing works for me while endless tinkering never actually did.
If your machine is under one year old with any defect at all — leaking, not brewing, error codes that won’t clear — call Keurig support before purchasing anything. They make this right. That’s the one situation where the answer is always a phone call, not a paperclip.